These are a size large. These will be listed on Hyenacart and Etsy tonight.
Wednesday, December 30, 2009
Lizard Longies
Tuesday, December 29, 2009
Pumpkin Loaf Recipe
I made these last night...and as you can see from the picture, they don't take long to disappear! The loaf on the left was attacked by my 3 year old...she loves it!
Here's the recipe, let me know what you think!2 cups pumpkin (cooked and mashed...fresh or from a can)
3 cups sugar
1 cup oil
2/3 cup water
4 eggs
3 1/2 cups all purpose flour
2 tsp baking soda
1 1/2 tsp salt
1 tsp cinnamon
1 tsp nutmeg
1/2 tsp ginger
Preheat oven to 350F. Grease and flour bottoms only of 2 loaf pans. Beat together first 5 ingredients, beat 1 min at medium speed. Add remaining ingredients, blend at low speed until
moistened. Beat 1 min at medium speed. Pour into pans, bake for 60 to 75 minutes, or until toothpick inserted in the top comes out clean. Cool 5 mins in pans before removing. Cool
completely.
Sunday, December 27, 2009
For the girls...
Thursday, December 24, 2009
Action Shots
Sunday, December 20, 2009
Sock Monkey Longies
So since we are stuck in the house, I had my husband cut out a nativity scene I have been wanting to make. I painted it up...and here is how it turned out:
I still need to stain the edges, sand them a little...and then I will add some fabric and rafia on their heads as...not sure what they are called...but veils maybe?? Hopefully I will be able to find some craft hay to glue on the manger also.
So.....now for the longies........
Friday, December 4, 2009
Let it Snow, Let it Snow, Let it Snow
They are a size medium...but I will take custom orders for these in different sizes..and colours :)
Just send me an email at petitekrottcreations@yahoo.com
Friday, November 27, 2009
Funky Stripes Holiday Longies
These are now listed in my etsy shop and they are ready to go in size small. If you would like a pair in another size, just let me know.
I only finished them tonight and couldn't wait to get them online...so the picture is quite dark. I will for sure take some better pictures when the sun decides to come out....unless they sell out before then.
Tuesday, November 17, 2009
Sneak Peeks!
and the other in lavender peruvian highland wool.
Next, here is a Ribbie knit with my very own colorway in shades of green, orange, and purple. I really love how it turned out!
Sunday, October 25, 2009
Knitting Sneak Peeks
Child size socks in grassy green and a redish-orange for a little man. These will go in the mail tomorrow.
Friday, October 23, 2009
Long Ribbie finished
Tuesday, October 20, 2009
Snappy Nappy Giveaway at Audrey's Country Crafts
Thursday, October 15, 2009
100 Sales coming up!!
Refund will be issued through paypal, does not include shipping costs.
Changing Shop
The custom slots on my Etsy shop will remain until they are purchased or they expire.
To request a custom order, you can email me at suzanned@ns.sympatico.ca
Monday, October 12, 2009
Some More Orders Finished....Here are some sneak peaks
These next items are for a special little girl's halloween costume. Can you guess what she will bee??
Sunday, October 4, 2009
Conversion of bumGenius Diapers
Wednesday, September 30, 2009
Free Wipe Solution Recipes
Making your own wipe solution is so easy and can even save you money too! Not only are these recipes great for wiping dirty bottoms, but you can also use them to wash dirty hands and faces.
I found these recipes here and I thought I would give you some of my favorites. These recipes don`t contain anything harsh for your baby, no alcohol or chemicals.
Many wipe solution recipes contain the same ingredients. There is a purpose for each ingredient also.
- Oil: Helps the wipe glide across baby's skin and keeps skin soft
- Soap: Cleanses by removing all traces of urine and feces
- EO: (Essential Oil) Added for antibacterial and/or aromatherapy purposes.
- Water: The main ingredient in each recipe, cleanses the diaper area and dilutes the other ingredients
How to Use Cloth Wipe Solutions
To mix your solution, start with your oil and end with your water. The oil also coats your measuring tools and will help the soap slide right off. To avoid lots of bubbles, add your water slowly.
Here are a few different ways to store and apply your wipe solution. Choose which one will be best for your family.
- Use a spray bottle to spray the wipes before use
- Use a bottle with a pull-up spout like those found on some bottled water bottles to dribble solution onto the wipes.
- Warm solution and place in an insulated container to provide warm wipes for baby.
- Place the solution into a commercial baby wipes container and dip wipes into the solution.
- Place cloth wipes in a commercial baby wipes container and pour wipes solution over wipes.
- A commercial baby wipes container can be placed in a wipes warmer to provide cozy warm wipes for baby.
Don`t store your solution or your wet wipes for much longer than one week, as they may become musty and will allow bacteria to grow. Mix your solution in smaller batches and check it daily for mustiness.
Some of my Favorite Cloth Wipe Solution Recipes
Steep the tea bags in the hot water then add the oil.
2 chamomile tea bags
2 teaspoons almond oil
2 cups hot water
Basic Wipe Solution
This basic recipe can be adapted by changing the type of soap or oil.
1/2 cup baby oil
1/2 cup baby wash
2 cups water
Easy Peasy
Just three simple ingredients...
2 tablespoons oil
2 tablespoons baby wash
1 1/2 cups water
Eight is Great
Similar ingredients as other recipes, but in different amounts.
1/8 cup vegetable oil
1/8 cup baby wash
8 drops lavender oil
4 drops tea tree oil
2 cups water
Lavender 'n' Tea Tree
Lavender and Tea Tree are popular EO choices for wipe solutions.
1/8 cup olive oil
1 tablespoon baby shampoo
4 drops tea tree oil
8 drops lavender oil
3 cups water
Olive 'n' Tea Tree
A great natural wipes solution.
1/4 cup olive oil (extra virgin not necessary)
1/8 cup gentle baby bath
A few drops tea tree oil
4 cups water
Soapless
This recipe relies on the EO to cleanse, instead of using soap.
1-2 drops tea tree oil
1-2 drops lavender oil
1 cup water
Saturday, September 26, 2009
Completed Orders
Baby gloves are finished as well and in the mail! They are so tiny. I think I will have to make a pair for myself next.
Tuesday, September 22, 2009
I was Featured!
Chocolate and Strawberry Longies Off my Needles
Sunday, September 20, 2009
Anniversary SALE!!
Saturday, September 19, 2009
Lavender Cream Ribbie Off my Needles
Friday, September 11, 2009
Caring for Your Wool Diaper Covers
You can wash your woolies in a lanolin rich soap, or simply add solid or liquid lanolin to your soapy water. The lanolin helps the wool retain its water-repellant nature. Lanolin is a wax like substance found naturally in wool. Lanolin naturally wicks moisture away from the baby's diaper, and makes the wool almost water-proof.
- Gentle soap (baby soap, baby shampoo, or olive oil soap work well)
- A large bowl or a sink that can be plugged for soaking
- Lanolin (there are many different kinds out there...you can use the breastfeeding lanolin Lansinoh or PureLan, or you may be able to find it at the pharmacy)
- Jar with a tight fitting lid
- Clean, dry towel
Step 1:
First, you need to melt your lanolin. Take your jar, put some hot (doesn't need to be boiling) water from the tap (if it gets hot enough) and add a pea-sized amount of lanolin. You will need more lanolin if you will be lanolizing more than one item.
Add 1-2 drops of baby shampoo or soap to the jar. Put the cover on tightly and shake. The water should melt the lanolin, and mix the soap into it. The water should look somewhat cloudy and there should not be any oily drops floating on the surface. If there are, it is the lanolin that has not melted properly. All you need to do is add more hot water, or heat it a few seconds in the microwave (without the cover).
Step 2:
Add this soapy mixture to your bowl or sink. Then you need to adjust the water temperature so you don't shock your wool. Add some room temperature or colder water to bring the mixture to almost room temperature. Turn your covers inside out and place in the water. You can gently squeeze the covers in the water to help the water soak in. Be gentle with your wool. Allow to soak at least 20 minutes or more (no more than 24 hours).
Step 3:
Once your woolies are finished soaking, gently squeeze out as much water as you can. Do NOT wring! Lay your towel down on a flat surface, and roll up your wool covers with the towel. You can place the rolled towel on the floor and step on it to get as much water out.
Step 4:
Lay your woolies flat to dry. You can occasionally turn them right side out/inside out to help them dry faster. Do not put them in direct sunlight, as this can heat them up and may cause shrinking. Drying time can take up to 2 days. If the only cover you are using is wool, it may take a bit of planning, so that you have some clean ones to use when the others are being washed.
When do wool covers need to be washed?
One nice thing about wool is that you don't have to wash it after every use! This is because the natural lanolin in the wool, which reacts with the urine to produce a natural "soap", which will help to clean the wool and keep bacteria from growing. This means your cover will never smell like urine once it is dry! Even after being soping wet, it will still dry and smell just like wool....unless your cover needs to be lanolized! You will know your wool need a refresher lanolization when it still smells like urine once dry or if it starts to leak.
After each diaper change (when the cover gets wet) all you need to do is air dry your wool. Once dry, you can re-use it. If your wool gets soiled, you can spot wash it with a mild soap, rinse, and then lanolize if needed as above.
Wednesday, September 9, 2009
What am I Working on?
I finished up the custom order for a friend of mine. The Ribbie turned out great, so I decided to make it available to Etsy-land. I am calling it the Sock Monkey Ribbie. What do you think??
I still haven't finished the pink with brown stripes longies...but I am working on it!
I have another custom order for 2 soakers, and 1 ribbie in girly colours! Beth took advantage of my Buy 2 get 1 50% off Labour Day Sale. Thank You Beth!! I love working with pinks and purples! Pictures coming soon of the finished items.
Friday, September 4, 2009
NEW! Recycled Sweater Longies Listed
For the following two, I wanted to do something a little different to make them unique, so I cut out some designs from scraps from other sweaters, and made these:
For this one, the deep wine/burgundy colour of the cashmere blend sweater looked so nice against the grey merino, I decided to pair the two together!
This one is another favorite. This blue cashmere sweater was so soft! The longies will keep one baby so nice and comfy I am sure! They are not thick enough for night time I don't think, but they would do great for day time from winter up to summer!
There will be more to come! I can also make soaker/shorties to match any of these. If you would like to make a custom request, please send me an email at petitekrottcreations@yahoo.com .
Wednesday, September 2, 2009
Wednesday - What am I Working On?
First off though, I recently relisted a pair of Longies made from a recycled lambswool sweater. They are grey with an orange stripe. They are super soft, and nice and thick for the upcoming longie season! I reduced the price also to $15 (from $19) so get them while they are hot!
The matching soaker is available here.
With that said, I am currently working on a huge local order. A complete starter pack complete with One Size diapers, wipes, doublers, and a wool soaker. I am working hard to get this order done before I go back to work/school soon.
I will soon be listing some of these wipes on my Etsy. They are super cute and will come in very handy for wiping bums, bathing, or washing pretty much anything. They are made with one layer of flannel (you get to pick the print!) and the other layer is cotton terry cloth.
This is the next item to be listed on La Petite Krott Creations Etsy shop. I am knitting them in a slightly different way than I normally knit my longies. In the past I have knit my longies, basically as soakers with longer legs. I found this allows for the same amount of "roomy-ness" in the back end for those bulky diapers, but with long legs to keep baby warm on those cold nights. I am using a few different free patterns for these, basically combining all the best parts of each pattern.
These will look more like regular pants, but they have short rown knit in the back to add room for the diaper. I am planning on making a nice girly ruffle at the bottom of the legs. More pictures to come once they are finished!
But, first I must finish another custom order as well.
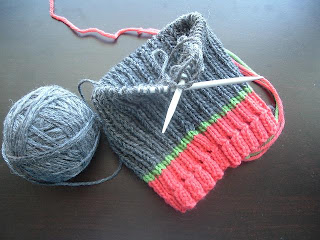
This is the start of a Ribbie, made for a little baby boy on his way to this world. The waist is a orangy-red colour. I added the narrow green stripe, and it turned out great...at least I think so! I will duplicate the green and orange stripe pattern on the leg cuffs. I hope they like it! I may have to make a second one to list on Etsy as well.
Well, that is all for this week's work. Check back again next Wednesday to see What I am Working on :)
P.S. Any colour suggestions for longies are welcome :)
Blog Design by Gisele Jaquenod